Safetica 9.8 no longer contains the Supervisor module. In all our new products, however, you still have printer overview and print alerts.
Information in this article applies to Safetica ONE 10 or older.
The Application control and Web control features are now available in Safetica Protection and Safetica Enterprise and can be managed in WebSafetica. The Print control feature can be replaced by DLP policies.
Which print control features are available in Safetica Protection and Safetica Enterprise?
- Controlling physical, network, and virtual printers
- Which documents were blocked by Safetica
- Print overview
Controlling physical, network, and virtual printers
You can allow, log, or block print and virtual print either in general as a whole channel, or specifically as individual printers.
Controlling print and virtual print in general
If you want to control print or virtual print in general for a specific user, a group of users, or the whole company, create a general policy with rules for print or virtual print in Safetica Management Console > Protection > DLP policies.
Controlling individual printers
If you want to create policies for individual physical or network printers or groups of printers, use Safetica Zones in Safetica Management Console. Go to Protection > Zones and add the desired printers into them. Each zone is a list that you can later use to create DLP policies.
How to add a network printer into a zone?
- Go to Protection > Zones and click Add zone.
- Name the zone and decide whether you consider the devices added to it to be safe. Then click OK.
- In the list on the left, select the newly created zone and click Add item.
- Add a network printer by clicking Printer.
- Fill in the information about your printer and confirm with Finish.
- Click the confirmation button in the upper right corner of the screen.
How to add a physical printer into a zone?
- The list of physical printers that can be added into zones can be found in Protection > Zones after clicking Unassigned items.
- In the list of zones on the left, choose the desired zone and drag and drop the desired printers from the Unassigned items table to the table next to it.
- Click the confirmation button in the upper right corner of the screen.
How to use zones to control printers?
The created zone can be used when setting up DLP policies to control printers:
- Go to Protection > DLP policies and click New policy.
- In Policy rules, find the Print slider and choose Safe zones allowed.
- Decide whether you want to allow all safe zones or whether you want to set each zone individually.
Which documents were blocked by Safetica?
If you want to find out for which files printing was allowed or blocked, go to Protection > DLP logs. In the Records table, filter out Print or Virtual print in the Operation column. You will see the name of the file, who initiated the printing, whether printing was allowed, blocked or logged, whether the file contained sensitive data and many other details.
Print overview
In the Supervisor module, it was possible to use quotas to determine, how many pages can an individual user print within a given time period. Safetica Protection and Safetica Enterprise bring a more sophisticated approach and allow you to restrict, what kinds of files can be printed. Printing is thus controlled more precisely than by quotas.
How to detect overuse of printers?
All information about printing and printers can be found in Safetica Management Console > Discovery > Print or in WebSafetica > Workspace > Print. You can find out e.g. who initiated the printing, what files were printed, the number of printed pages, from which applications, on which device, or whether the printing was in color or black and white.
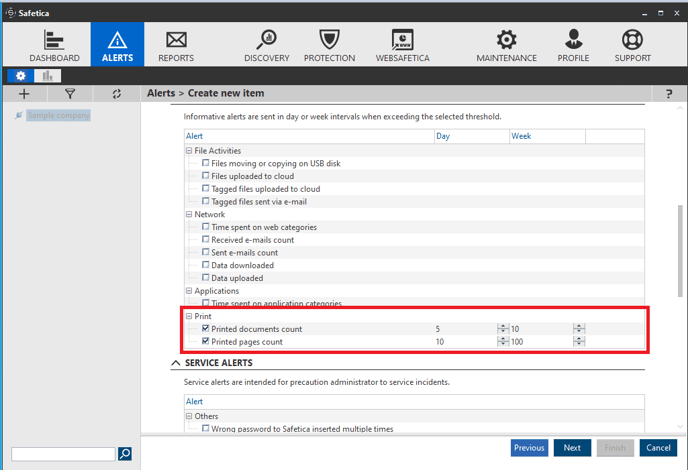
If you want to be informed about who exceeded the given number of printed pages, use Alerts:
- In Safetica Management Console, go to Alerts, choose the Settings mode, and click New rule.
- Fill in the name and description of the alert. In the next step, go to Informative alerts and choose Printed documents count and/or Printed pages count (depending on what you are interested in).
- After you check the desired alerts, you can set a daily or weekly threshold. If that threshold is exceeded, an alert is sent to the administrator.
- In the next steps, choose the user, whom the alert applies to, and also addresses, where it will be sent.
Note: If you have purchased Safetica Enterprise, you can send your alerts to your SIEM or syslog server.
How to restrict what can users print?
In Safetica Protection and Safetica Enterprise, you can use data policies to block the printing of documents with sensitive data – for example documents that contain a certain expression, have a certain extension, or were exported from a certain application.
You can use application policies to block printing from a certain application or category of applications (e.g. printing from CAD software).