Connect Safetica ONE to the FortiGate server and prepare a background for recognizing and protecting files classified by Safetica.
Please note that integration with FortiGate is only available in Safetica ONE Enterprise.
Information in this article applies to Safetica ONE 10 or older.
Integration of Safetica ONE data loss prevention & insider threat protection solution with Fortinet network security technologies provides companies with a powerful tool to secure their data no matter where it resides or flows.
In this article you will learn:
- The benefits of the integration
- Supported product versions
-
How to establish the connection between Safetica and FortiGate
- Integration features - overview
- How to implement the protection feature
- Optional features
Benefits
- Data protection: Share information about sensitive data classified by Safetica metadata technology with FortiGate and decide how should FortiGate react once such a file is detected in network traffic.
- SIEM: The results can be automatically sent to the company’s SIEM system.
- Mimic FortiGate’s SSL inspection: Safetica will detect the presence of FortiGate's SSL inspection on endpoints and follow its behavior. The same exclusions will be applied.
- Certificate deployment: Safetica offers help with certificate deployment once the deep-SSL feature on FortiGate is about to be activated. This feature can help not only when the Data protection feature is required but also when advanced UTM features on FortiGate are set up.
You can integrate more than one FortiGate, but each must be set in Safetica Management Console separately.
Supported product versions
- Safetica 10+ supports FortiGate versions 6.4 to 7.2
- FortiGate running FortiOS 6.2+
- FortiGate SSL inspection is required for the data protection feature to work.
-
FortiOS 6.2.2+ hides parts of the DLP configuration GUI, however, the functionality is still available and accessible via the FortiGate CLI.
How to establish the connection between Safetica and FortiGate
- Log in to FortiGate Management Console.
- Go to System > Admin Profiles and click Create New.
- Choose a Name for your Safetica admin profile and make sure to set at least these required permissions:
|
Access Control |
Minimum required permissions |
Required for |
|
Firewall |
Read/Write |
Getting information about SSL certificates and creating pre-configured firewall policies |
|
Log & Report |
Read/Write |
Allowing configuration of reporting to SIEM |
|
System > Configuration |
Read |
Getting information about SSL certificates |
|
System > Maintenance |
Read |
Getting FortiGate version |
|
Security Profile > Data Loss Prevention |
Read/Write |
Creating DLP sensors that detect Safetica classification |
|
VPN |
Read |
Getting information about SSL certificates |
- Go to System > Administrators and click Create New > REST API Admin.
- Choose a Username for your Safetica REST API Admin.
- Under Administrator Profile select the profile created in previous steps.
- Turn the PKI Group off.
- Under Trusted Hosts make sure that your Safetica Management Server’s IPv4 or IPv6 address is included (192.20.30.40/32 or fe80:1e1f:802e:1af5:50af:fdc2:1a10:f414/128).
- Confirm by clicking OK and you will be shown the API key for your new Safetica REST API admin – copy it to a secure place.
- Log in to Safetica Management Console.
- Go to Maintenance > Integration settings > FortiGate Integration and click Connect to FortiGate.
- Enter your FortiGate address– you may use:
- An IP address, including the http(s):// prefix (e.g. https://192.10.20.30).
- A domain name (e.g. https://FortiGate).
- Enter your FortiGate API key obtained in previous steps.
- Click OK.
- Once the connection is verified without errors, save your settings by clicking ✔.
- Enter your FortiGate address– you may use:
Integration features - overview

- Import all SSL certificates and distribute them using Safetica:
Downloads self-signed certificates used for deep SSL inspection from FortiGate and distributes them automatically to endpoints with installed Safetica Clients. - Create FortiGate policies for detecting Safetica data categories:
Safetica takes all the metadata data categories and creates a background on FortiGate side to be able to detect and protect such data even without the presence of Safetica Client. - Policy action for detected files with Safetica classification:
Decides what steps will be taken by FortiGate once a classified file is detected in network traffic. You can either log or block such connections. - SIEM IP address/FQDN for FortiGate DLP logs (optional):
Extends point 3. with the option to share such information with the company’s SIEM system automatically. - Alerts – FortiGate sync error:
An alert is sent to the chosen SIEM/Email address whenever the connection with FortiGate is dropped. The alert can be enabled/disabled in Safetica Management Console > Alerts after clicking the desired alert or the New rule button:
How to implement the protection feature
1. First step – Connecting to FortiGate without any feature enabled:Create the Rest API account using the instructions at the beginning of this article and set up the integration without enabling any of the features available.
2. Second step – Implementing deep SSL inspection on FortiGate:To set up the DLP feature on FortiGate, deep SSL inspection is required. To use the deep SSL inspection, you will need to distribute FortiGate’s CA certificate to the endpoints. How to do that? There are the following options:
- You are already using deep SSL inspection: If you are already using the deep SSL inspection from FortiGate, the certificates will already be distributed, and you can skip to step 3 right away.
- You do not have deep SSL inspection in place yet: If you do not have the SSL inspection from FortiGate implemented yet, consider your current Safetica Client distribution:
- If 100% of the environment that’s going to have deep SSL inspection enabled is covered by Safetica Client, you can simply use the import SSL feature available in Safetica’s FortiGate integration and that will do the distribution for you.
- If you do not have 100% covered, it will be necessary to do the certificate distribution prior to enabling the deep SSL inspection on FortiGate using a different tool - otherwise the endpoint users will receive a certificate error.
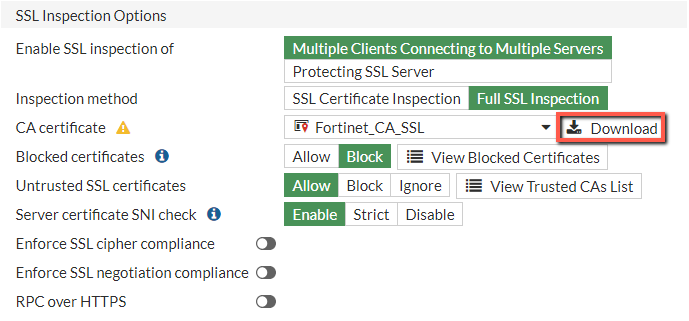
The easiest way to download the right certificate from FortiGate is by visiting the FortiGate Console → Security profiles → SSL/SSH inspection. Then edit the profile you will be using for your SSL inspection and click the Download button.
3. Third step – Creating/evaluating Safetica’s metadata data categories
Create/evaluate your metadata data categories in Safetica Management Console > Protection > Data categories and write down the exact metadata data category name – case sensitive.
4. Fourth step – Syncing the data categories with FortiGate
a. Go to Safetica Management Console > Maintenance > Integration settings > FortiGate integration section and enable the Create FortiGate policies for detecting Safetica data categories feature. Then below, choose whether FortiGate should log or block connections transferring the sensitive file.
b. The successful sync will be represented by new deactivated firewall policies on FortiGate server and created DLP sensors (those are visible only via CLI).
5. Fifth step – Finish the configuration in FortiGate consolea. Go to FortiGate console and create a duplicate of the policy where you would like to inspect the traffic on sensitive content. Place this policy above the original one, name it and write down its ID.
b. Open FortiGate’s CLI and run the following commands:
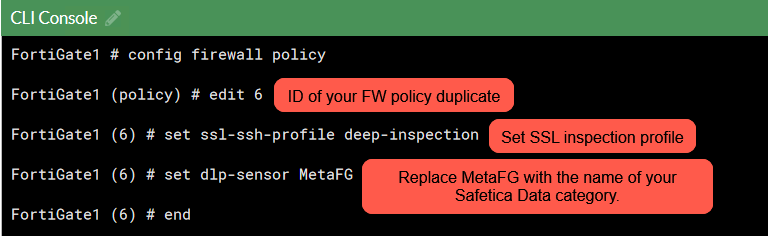
c. If you have any blank spaces in the data category name, use the escape character “\”.
E.g.: My category -> My\ category.
d. Close the CLI, enable the newly modified policy, and disable the old one.
If the FW policy doesn’t work as expected, check its settings as shown below:

To see the configuration of the DLP sensor:
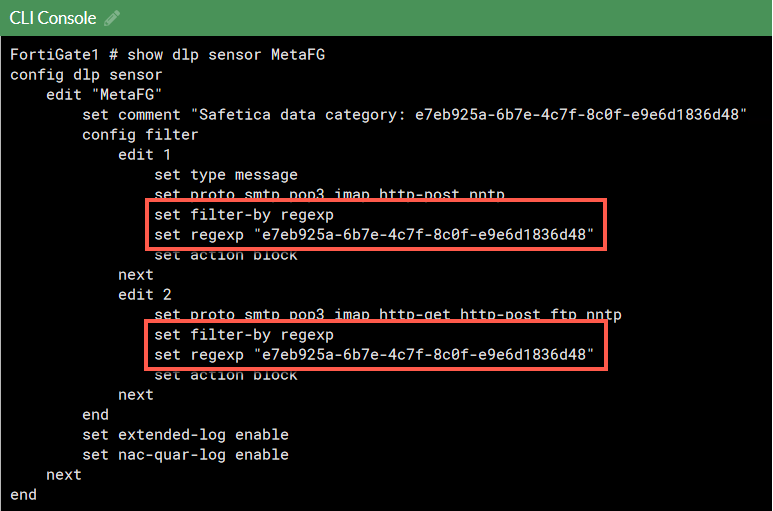
The searched regex should match your data category GUID shown in Safetica Management Console > Protection > Data categories.
Optional features:
Synchronize FortiGate SSL inspection with Safetica
- Log in to Safetica Management Console.
- Go to Maintenance > Integration settings > FortiGate Integration, locate the relevant FortiGate instance and click Edit.
- Turn on Import all SSL certificates and distribute them using Safetica.
- Click OK.
- Click ✔.
- Go to Maintenance > Integration settings > Network Certificates and set first switch to Full – Custom.
- Click ✔.
When you refresh the view, all active SSL certificates from FortiGate will be listed in Safetica’s Network Certificates section.
You can remove imported SSL certificates in FortiGate and then refresh the sync state in Safetica Management Console by clicking the Refresh button. Alternatively, you can remove all synced SSL certificates by turning off the option Import all SSL certificates and distribute them using Safetica.
If you need a more selective way to sync SSL certificates, you can import individual certificates manually under Network Certificates using the Import button.
FortiGate service alert
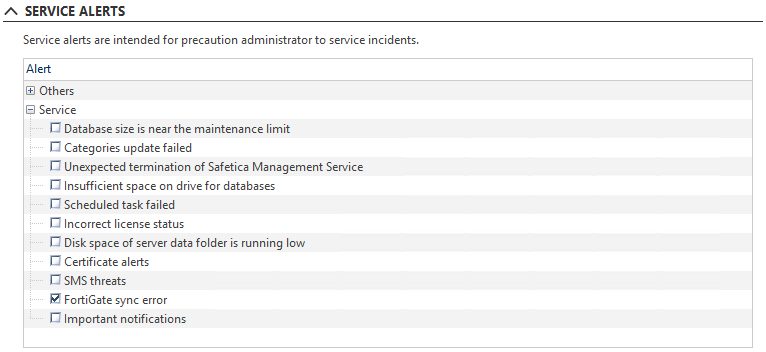
If you want to make sure that your configured FortiGate integration works correctly, you can set up a Safetica service alert. It will warn you when an error has occurred on a synchronized FortiGate appliance:
- Log in to Safetica Management Console.
- Go to Alerts and click New rule.
- Follow the configuration wizard.
- When you reach the SERVICE ALERTS section, tick the FortiGate sync error
- Finish the configuration wizard.
- Click ✔.
Sending FortiGate DLP logs to SIEM
Besides one-off viewing of FortiGate DLP logs using the above mentioned CLI commands, you can also have them automatically sent to your SIEM. Thus, an incident will not only be logged in your FortiGate appliance, but you will also have the log available for further use.
To enable this feature:
- Log in to Safetica Management Console.
- Go to Maintenance > Integration settings > FortiGate Integration.
- To add a new FortiGate appliance, click Connect to FortiGate. Otherwise, select the relevant FortiGate appliance and click Edit.
- Enable the Create FortiGate policies for detecting Safetica data categories. You can choose whether detected files should be blocked or just logged.
- Fill in your SIEM IPv4 or IPv6 address or fully qualified domain name (hostname.domain.com) into the SIEM IP address/FQDN for FortiGate DLP logs (optional) field. If you leave this field empty, detected files will be either logged or blocked, but the logs will not be sent to your SIEM.
- Click OK.